首页 >> 你造屌丝的后花园是怎么打理的吗?
你造屌丝的后花园是怎么打理的吗?
来源:  时间:2015-12-07
分享到:

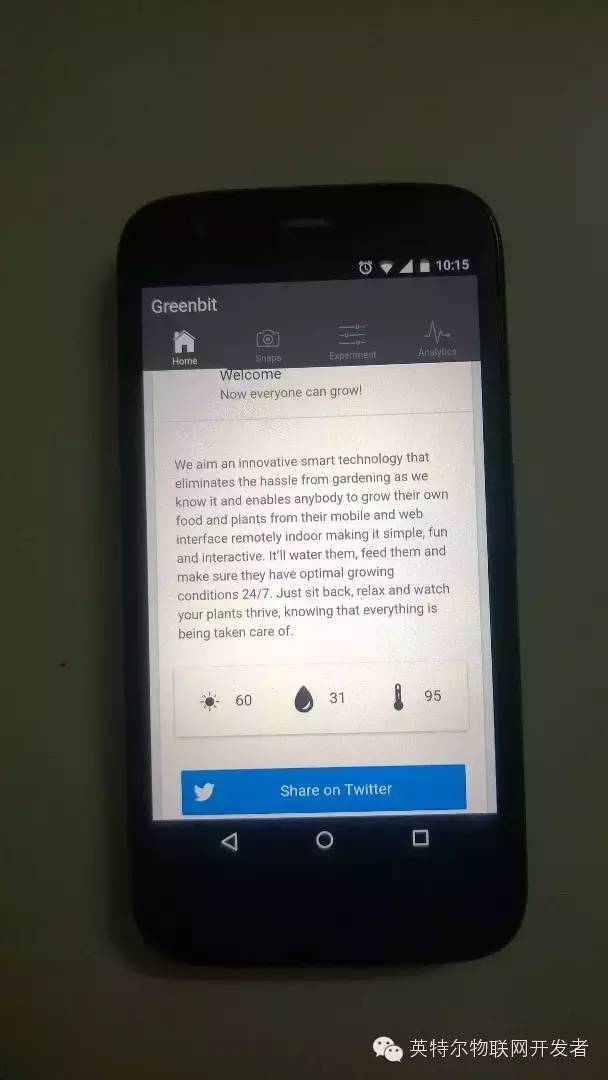
本文旨在介绍一种创新型的智能物联网科技来帮你管理园林。使用此系统能够消除园林管理的麻烦,并且操作起来十分便捷,它简单易懂,任何人都可以使用它去种植自己想要的植物果蔬。在这个系统的帮助下,主人只需要通过手机和网站接口在室内进行遥控,在它的帮助下,种植这件事是不是变得更加简单,有趣,且互动性强。系统会帮你给植物浇水,施肥,并且确保它们能享受24/7全天候最佳生长环境。你只需要坐回沙发,看着你的植物茁壮成长,相信它们会被好好照看。

系统运用一系列的传感器和执行器为植物创建良好的生长环境,在它们需要的准确时间为它们浇水、施肥。

设置将会和我们手机上的APP和网页应用相连接,因此你可以随时了解植物的生长动态。系统可以追踪监测植物的成长,分析它们的生长过程。你还可以借助系统在植物上做一些商业性的实验。

1
系统如何工作?

此项目包含4个部分:

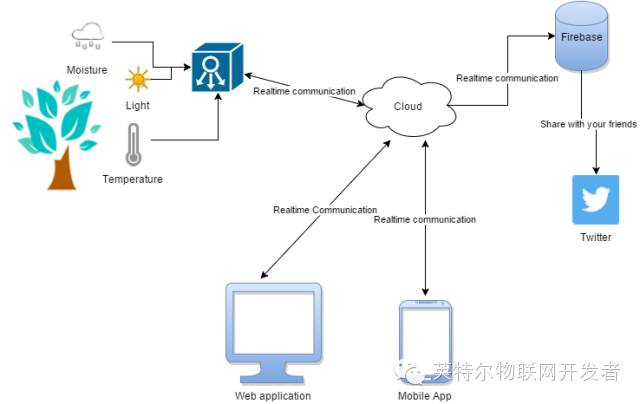
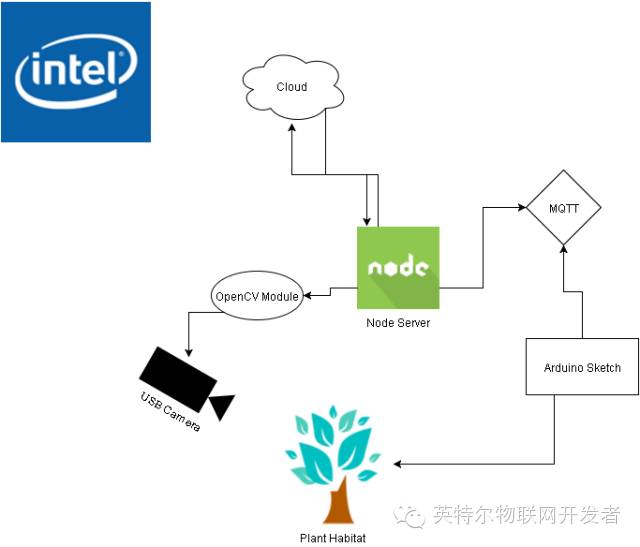
1.植物生长环境植物上的一系列传感器和执行器,由英特尔爱迪生控制。爱迪生与云的连接由Node.js伺服器控制。

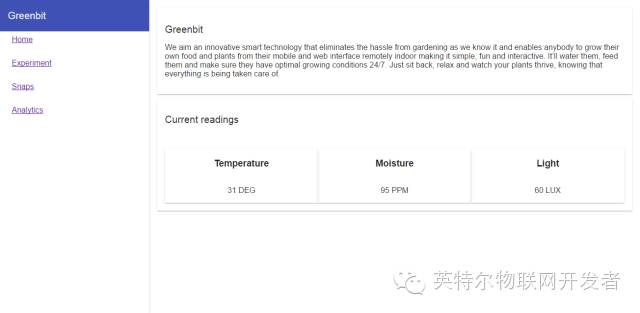
2.安卓APP和网页应用控制、监测植物生长数据,进行系统设置。

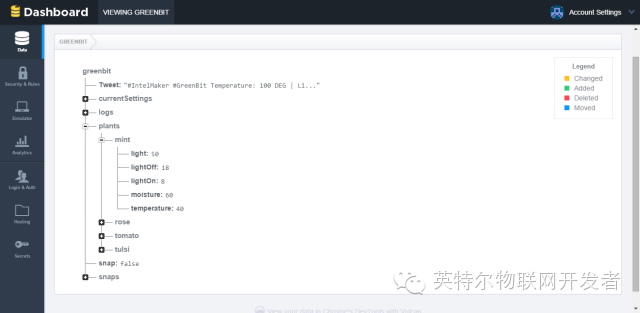
3.实时云支持后端—爱迪生、手机应用程序和网页通过i.e. Firebase连接到云后端,我们的设计中没有任何中间层,它是一个双层的架构。

4.社交分享你可以把你的种植经历再社交媒体上分享给你的好友。

2

特性

英特尔爱迪生将被用来实现数据获取,将从植物及其周边获取的所有数据收集起来,进行处理,再实时地发送给服务器。系统将对环境温度、光照以及湿度等参数进行监测,使用的传感器有光敏传感器、温度传感器、湿度传感器。

我们为系统设置了一个简易的继电器,用它来控制植物周围的光照、水量和温度状况,一旦数据被服务器接收,它会被进一步处理,最后以图表的形式呈现所有参数。
基于浏览器的微型网站和安卓应用程序将包括以下几个部分:
1.监测功能;
2.预置控制;
3.手动设置;
4.分享功能;
5.通知功能;
6.快照。

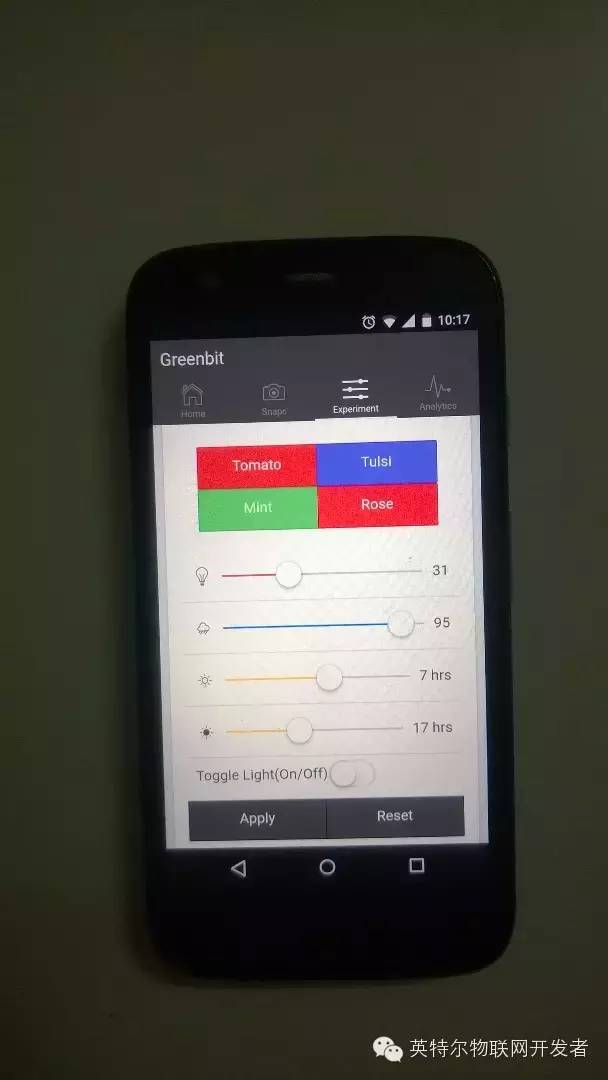
你可以用以下两种方式控制系统:1)自主操作;2)预置

跟踪进度:监视植物当前的生长状况和生活条件,以图表形式呈现;

点击和成长:只要你告诉程序你希望植物长大,植物就会自动加载编程,为你的植物工厂进行设置。

分享:当你按下鸣叫按钮,你就可以把你家小园子的健康和生活状况发布到Twitter账户上去啦。

报警:当任何值不在最佳范围内的时候,系统将会报警。

3

物料准备

开发板:

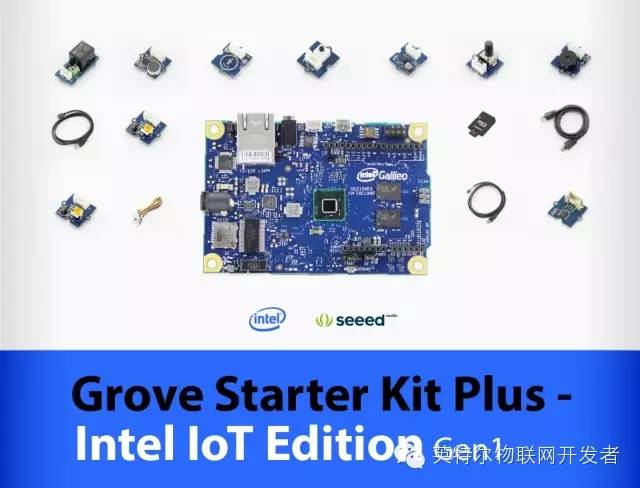
英特尔爱迪生板;

传感器:
1.湿度传感器;
2.LM 35温度传感器;
3.光敏传感器;

4.水流传感器;

执行器:
1.吹风机;
2.6W RGB LED;
3.马达;
4.USB摄像头;

5.12V 继电器板;

其他:
1.桶;
2.植物;
3.管子;
4.剪刀;
5.焊锡枪;
6.胶枪。
4
传感器和执行器

光传感器

此传感器被用来监测植物周围的光照是否在最佳值范围之内,更有甚者,它还能进行时钟同步,例如日出和日落。它会一直监控着光照情况,一旦发现问题,立刻报警。

温度传感器

温度传感器监测植物周围的温度,根据不同的模式,它会调节温度,来效仿植物生长的最佳条件。

湿度传感器

显示湿度等级,并触发土壤中的水泵,给植物浇水。

水流传感器

它测量水流,基于测量数据提供植物的水流消耗。

USB摄像头

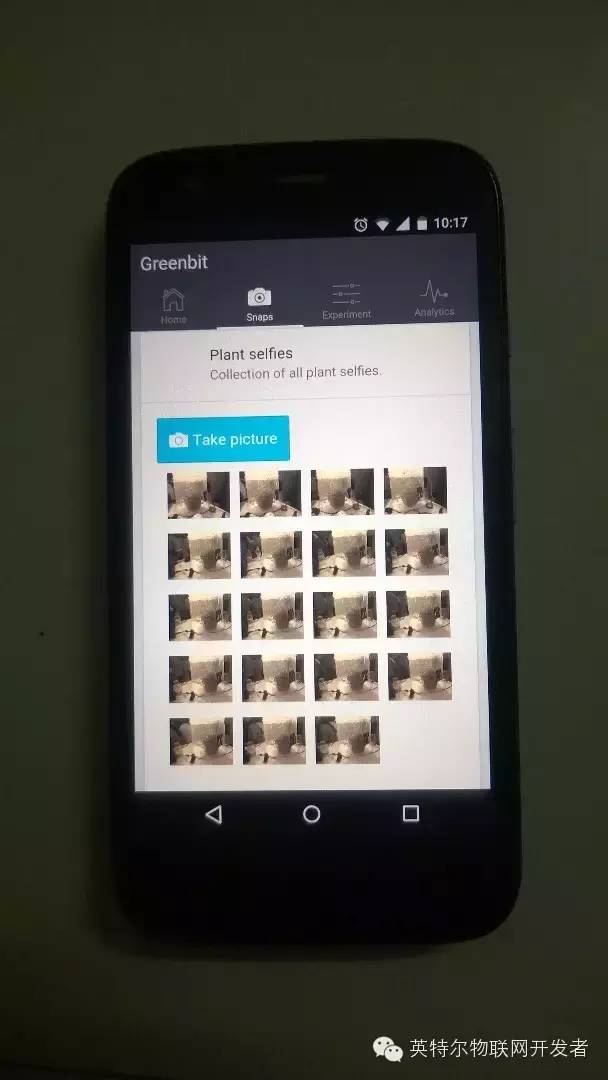
我们可以用它来抓拍植物成长过程的照片,做一个记录。

5
硬件终端

英特尔爱迪生是整个系统的核心,它可以完成以下功能:

1)        收集数据;
2)        执行命令;
3)        拍照;

4)        将数据发送至云;

技术方面:
1) Node.js伺服器;
2) OpenCV代码;
3) Arduino草图;

4) MQTT。

注:
① Node.js是一个基于Chrome JavaScript运行时建立的平台, 用于方便地搭建响应速度快、易于扩展的网络应用。

② OpenCV的全称是:Open Source Computer Vision Library。OpenCV是一个基于(开源)发行的跨平台计算机视觉库。本文中的“OpenCV”均指此含义。

6

软件流程

在我们的设置当中,客户端应用程序并不会直接与植物进行交流,每一步的处理工作都是通过云来完成,因为只若是将系统与WiFi连接起来,仅仅实现了物联网中的联网。

Arduino草图

Arduino的草图实现包含传感器的数据采集和指挥执行的逻辑。客户端使用说明由网站服务器接收,接着使用MQTT协议与Arduino交流。

什么是MQTT?

MQTT是MQ Telemetry Transport的缩写,表示MQ遥测传输。它是一种具有发布/提交功能的极轻便的信息协议,此协议专门针对受限设备而设计,适合低带宽、高延迟、网络状况差的情况。设计原则是尽量减少对网络带宽和设备资源的需求,同时试图确保可靠性,并且在一定程度上确保能够发送。这些协议规则在平时的使用中被证明能够使新兴的“机器对机器”的连接变得顺畅,针对移动端应用的带宽和电池电量都有改善作用。

Node.js伺服器

Node.js伺服器只能在英特尔爱迪生上运行,它能够实时得和云后端保持连接,设计亮点在于我们为GreenBit系统采取两层架构,而非传统的三层架构。

Node.js有四项主要职责:
1)   实现与云的实时连接:此连接使用FireBaseApi实现,Api基本上能让我们对某些参数进行一系列的监控,一旦这些值有任何的变化,系统将会立即发送到客户端;
2)   点击图片上的OpenCV:每当接收到植物“自拍”请求时,Node.js伺服器就执行OpenCV模块,这需要先拍一张照,然后将它以Base64编码格式储存在系统文件中。节点服务器将读取该文件,然后以编码的形式向伺服器传送图像;
3)   每一分钟收取一次记录:以一分钟为节点,系统要求Arduino读取并且将它传送到MQTT上的节点;

4)   调用执行器:从APP上获取请求,例如改变参数或参数值,照相等等,都传达给Arduino。

7

伺服器代码

// Include all modules required in your server
var Firebase =  require('firebase');
var mraa = require("mraa");
var fs = require('fs');
// Create a new Firebase Reference object  with your Firebase application url
var firebaseRef =  new Firebase('.firebaseio.com');
//Initialize values
var currentSettings = null;
var pushedSettings = null;
/********** Trigger message sending interrupt every 20 seconds *************/
var notifier_pin = new mraa.Gpio(5);
notifier_pin.dir(mraa.DIR_OUT);
// IPC to read data from Arduino Sketch ()example content: 123|45|200|....|0)
//Subscribe to interrupt notifications from Arduino
var subscriber_pin = new mraa.Gpio(1);    
subscriber_pin.dir(mraa.DIR_IN);    
subscriber_pin.isr(mraa.EDGE_RISING, subscriberEvent);
//Attach change event listener on Firebase currentSettings value
// Everytime the currentSettings value changes the callback will be executed.
// Ref:  https://www.firebase.com/docs/web/api/query/on.ht...
firebaseRef.child('currentSettings').on('value', function(dataSnapShot){  
 // Get the new settings
 var data = dataSnapShot.val();
 // Set the updated settings in pushed settings    
 pushedSettings = data;        
 //If the lightState is true then we need to switch on the otherwise vice versa  
  if(data.lightState)        
   data.lightState = '1';    
  else
      data.lightState = '0';    
  //Now we need to pass currentSettings value to Arduino to take appropriate action    
  //Since arduino cannot understand Node object we will create a concatenated string with values   //and pass it to Arduino using MQTT
  var arduinoSettingString = 'abcd'+'|'+data.plant+'|'+data.lightState+'|'+data.lightOn+'|'+data                              .lightOff+'|'+data.moisture+'|'+data.temperature;
  fs.writeFileSync("/home/root/ipc_codes/js_notification_out.txt", "NodeJS: "
                   + arduinoSettingStr   ing + "\n");    
  // Notify all the subscribers of the MQTT broker    
  notifyWorld();
});
//Fire event to notify all subscribers
function notifyWorld() {    
  notifier_pin.write(1);    
  setTimeout(function(){        
    notifier_pin.write(0);    
  },100);
}
// Subscribe event of Node server
// This event is called when data is sent from  Arduino to Node over MQTT
function subscriberEvent() {    
 var arduinoSettingString = fs.readFileSync('/home/root/ipc_codes/arduino_notification_out.txt')               .toString();    
 currentSettings = arduinoSettingString.split('|');  
 // In case tweet setting is true then send a tweet through firebase    
 // This setting is true whenever person touches the Tweet touch sensor    
 if(currentSettings[currentSettings.length -1] === '1')    
 {    
    var tweet = 'Temperature: '+ currentSettings[0] +' DEG  | Moisture: '+ currentSettings[1] +'     PPM | Light:'+ currentSettings[2]+ ' LUX';    
   firebaseRef.update({Tweet : tweet});    
 }
 //Add a new entry in logs    
   firebaseRef.child('logs').push({    
      temperature: currentSettings[2],      
      moisture: currentSettings[1],    
      light: currentSettings[0]    
    });
}
8

OpenCV伺服器

//Opencv node  server for sending Images
var Firebase = require('firebase');
var fs = require("fs");
var firebaseRef = new Firebase('https://greenbit.firebaseio.com');
var image_original =  "/home/akshay/Desktop/IoT/images/sepia.jpg";
//Attach watcher on snap value in firebase
//This value is set to True everytime a snap request comes from the App or web-app
firebaseRef.child('snap').on('value',function(snapShot){
 var value = snapShot.val();
 // If there's a snap request
 if(value){
   fs.writeFile("/home/akshay/Desktop/IoT/write.txt", "D", function(err) {
    if(err) {
     return console.log(err);
    }
    console.log("The file was saved!");
    func();
       });
 // Wait for two seconds because opencv will click the photo and save it in a file
 setTimeout(function(){
   //Read the file from the saved location
   fs.readFile(image_original,  function(err, original_data){
       //Get the string
       var base64Image = original_data.toString('base64');
       //Add a new snap in Snaps array in Firebase
       firebaseRef.child('snaps').push(base64Image);
      });
      firebaseRef.child('snap').set(false);
 }, 2000);
}
});
fs.readFile(image_original, function(err, original_data){
   var base64Image = original_data.toString('base64');
   console.log(base64Image);
   });
//Execute Opencv
var exec = require('child_process').execFile;
fs.writeFile("/home/akshay/Desktop/IoT/write.txt", "C", function(err) {
   if(err) {
       return console.log(err);
   }
   console.log("The file was saved!");
   func();
});
// start the server
var func = function(){
   console.log("Server starts!!");
   exec('/home/akshay/Desktop/IoT/laptop', function(err, data){
       console.log(err);
       console.log(data);
   });
}
9

Arduino草图

// Arduino sketch
#include
#include
#include
#include
#include
#include
#include "rgb_lcd.h"
rgb_lcd lcd;
// make some custom characters:
byte heart[8] = {
   0b00000,
   0b01010,
   0b11111,
   0b11111,
   0b11111,
   0b01110,
   0b00100,
   0b00000
};
byte smiley[8] = {
   0b00000,
   0b00000,
   0b01010,
   0b00000,
   0b00000,
   0b10001,
   0b01110,
   0b00000
};
byte armsDown[8] = {
   0b00100,
   0b01010,
   0b00100,
   0b00100,
   0b01110,
   0b10101,
   0b00100,
   0b01010
};
byte armsUp[8] = {
   0b00100,
   0b01010,
   0b00100,
   0b10101,
   0b01110,
   0b00100,
   0b00100,
   0b01010
};
// Defining Macros
#define DEBUG 1
// Analog Pins Definition
const int light = 0;        
const int temp = 1;
const int moisture = 2;
const int waterFlow = 3;
// Digital Pins Definition
const int touch = 2;
const int bulbRelay = 4;
const int fanRelay = 7;
const int pump = 8;
const int ledPin = 13;
//IPC pins
int notifier_pin = 3;
int js_subscriber_pin = 6;
FILE *fromarduino, *toarduino;
int i = 0;
int c;
// Timer
unsigned long timeOut = 0;
bool newdata = false;
int showType = 0;
int mapLight;
int mapTemp;
int mapMoisture;
String lightString;
String tempString;
String moistureString;
int B = 3975;
char charVal[10];
char ipcString[200];
//Touch Bool
boolean touchStarted = false;
boolean tweetState = false;
String plantName = "";
String lightState = "";
char *incomingString;
char *splitVal;
String input = "";
int counter = 0;
int lastIndex = 0;
const int numberOfPieces = 6;
String pieces[numberOfPieces];
// Funtion to print error
void printError(char *str)
{
 Serial.print("Error: ");
 Serial.println(str);
}
void setup()
{
 Serial.begin(115200);
 pinMode(light, INPUT);
 pinMode(temp, INPUT);
 pinMode(moisture, INPUT);
 pinMode(waterFlow, INPUT);
 pinMode(bulbRelay, OUTPUT);
 pinMode(fanRelay, OUTPUT);
 pinMode(pump, OUTPUT);
 pinMode(ledPin, OUTPUT);
 pinMode(notifier_pin, OUTPUT);  
 pinMode(js_subscriber_pin, INPUT_PULLUP);
 // set up the LCD's number of columns and rows:
 lcd.begin(16, 2);
 lcd.clear();
 lcd.setRGB(0, 255, 0);
 lcd.createChar(0, heart);
 lcd.createChar(1, smiley);
 lcd.createChar(3, armsDown);
 lcd.createChar(4, armsUp);
 lcd.setCursor(0, 0);
 lcd.write(4);
 lcd.write(4);
 lcd.setCursor(4, 0);
 lcd.print("GREENBIT");
 lcd.setCursor(14, 0);
 lcd.write(4);
 lcd.write(4);
 digitalWrite(bulbRelay, HIGH);
 digitalWrite(fanRelay, HIGH);
 //Interrupts Initialization
 attachInterrupt(touch, touchTweet, CHANGE);
 attachInterrupt(js_subscriber_pin, subscriberEvent, RISING);
 delay(10);
}
void loop()
{
 lcd.setCursor(0, 1);
 lcd.print(plantName);
//  lcd.write(3);
//  delay(10);
//  lcd.write(4);
//  delay(10);
 int setTemp, setLight, setMoisture;
 if(timeOut == 0)
 timeOut = millis();
 if ((millis()-timeOut) >= 1000)
 {
   Serial.println("Test");
   mapLight = analogRead(light);
   mapTemp = analogRead(temp);
   mapMoisture = analogRead(moisture);
   //Light processing
   mapLight = map(mapLight, 0, 800, 0, 100);
   //Temperature processing
   float floatTemp = (float)(1023-mapTemp)*10000/mapTemp;
   int tempCelsius=1/(log(floatTemp/10000)/B+1/298.15)-273.15;
   String lightString = String(mapLight);
   String tempString = String(tempCelsius);
   String moistureString = String(mapMoisture);
   Serial.print(tempCelsius);
   Serial.print(mapLight);
   Serial.println(mapMoisture);
   String finalString = tempString + "," + moistureString  + ","  + lightString;
   finalString.toCharArray(ipcString, finalString.length()+1);
   Serial.println(ipcString);
   publishData();
   notifyWorld();
   delay(100);
   timeOut = millis();
 }
 //Temperature control
 if(mapTemp > setTemp)
 {
   do
   {
     digitalWrite(fanRelay, HIGH);
   }while(mapTemp < (setTemp - 5));
 }
 else if(mapTemp < setTemp)
 {
   do
   {
     digitalWrite(fanRelay,LOW);
   }while(mapTemp < (setTemp + 5));
 }
//Light Control
if(lightState == "0")
{
 digitalWrite(bulbRelay, LOW);
}
else
 digitalWrite(bulbRelay, HIGH);
//Moisture and Motor Control
   if(mapMoisture > setMoisture)
 {
   do
   {
     digitalWrite(pump, HIGH);
   }while(mapMoisture < (setMoisture - 5));
 }
 else if(mapMoisture < setMoisture)
 {
   digitalWrite(pump,LOW);
 }while(mapMoisture < (setMoisture + 5));
}
//loop ends
//ISR
void touchTweet()
{
 digitalWrite(ledPin,HIGH);
 if(mapTemp < 20)
 {
   tweetState = 1;
   lcd.setRGB(200, 0, 0);
   lcd.setCursor(0, 1);
   lcd.write((unsigned char)0);
   lcd.setCursor(3, 1);
   lcd.print("I AM SAD");
 }
 else
 {
   tweetState = 0;
   lcd.setRGB(0, 200, 0);
   lcd.setCursor(0, 1);
   lcd.print("Light: ");
   lcd.print(mapLight);
   for (int positionCounter = 0; positionCounter < 13; positionCounter++)
   {
       // scroll one position left:
       lcd.scrollDisplayLeft();
       delay(150);
   }
   lcd.setCursor(2, 1);
   lcd.print("I");
   lcd.setCursor(4, 1);
   lcd.write((unsigned char)0);
   lcd.setCursor(6, 1);
   lcd.print("GREENBIT");
 }
 Serial.println("Touch Detected!!!");
}
//Read message from js notification file
void subscriberEvent() {
  toarduino = fopen("/home/root/ipc_codes/js_notification_out.txt","r");  //Opening message from JS
  if (toarduino)
  {
   while ((c = getc(toarduino)) != EOF)
   {
     if(c != 10)//new line
     {
          Serial.print((char)c);
     }
   }
   Serial.println("");
   Serial.println("----------------");
   fclose(toarduino);
  }
}
void publishData()
{
 fromarduino = fopen ("/home/root/ipc_codes/arduino_notification_out.txt", "w+");
 fprintf(fromarduino, "[%s]", ipcString);
 fclose(fromarduino);
}
//Nofity any body connected to this interrupt  (C++ program and NodeJS) program
void notifyWorld()
{
   digitalWrite(notifier_pin, HIGH);
   delay(100);
   digitalWrite(notifier_pin, LOW);
}
//Print data on Serial monitor and to adjust the sensor values upto 3 digits
void print_data(int val)
{
 int new_val;
 if(val<0)
 new_val = 0;
 else if(val>255)
 new_val=255;
 else new_val = val;
 if(new_val<10)
 {
   Serial.print(0);
   Serial.print(0);
   Serial.print(new_val);
 }
 else if(new_val>=10 && new_val<100)
 {
   Serial.print(0);
   Serial.print(new_val);
 }
 else
 Serial.print(new_val);
}
10

OpenCV 模块

//OpenCV code to click images in multiple formats
// like Sobel, Blur, Sepia etc
#include iostream
#include opencv2/opencv.hpp
#include opencv2/highgui/highgui.hpp
#include opencv2/core/core.hpp
#include opencv2/imgproc/imgproc.hpp
using namespace std;
using namespace cv;
int main ()
{
  // local variable declaration:
  char parameter;
  cout << "Enter the parameter: ";
  cin >> parameter;
  // image variables
  int width = 640;
  int height = 480;
  Mat capImg;
  Mat grayImg;         //Gray Image
  // Sobel Image
  Mat sobleGrayImg;
  Mat sobelImg;
  Mat grad_x, grad_y;
  Mat abs_grad_x, abs_grad_y;
  int sscale = 2;
  int sobelDelta = 0;
  int ddepth = CV_16S;
  // Blur Image
  Mat blurImg, blurGrayImg;
  // SEPIA IMAGE
  Mat sepiaImg;
  Mat_ sepia(3,3);
  // Canny Image
  Mat cannyImg;
  int threshold1 = 1;
  int threshold2 = 150;
  // Laplace Image
  Mat laplaceImg;
  Mat src_gray, dstImg;
  int kernel_size = 3;
  int lscale = 1;
  int laplaceDelta = 0;
  int c;
  // Canny Blur Image
  Mat cblurImg, cb_grayImg;
  // Pattern Image
  Mat dst, cir;
  Mat cir_32f, dst_32f;
  int bsize = 8;
  VideoCapture cap(-1);
  if(!cap.isOpened())
  {
     cout<<"Cam Not opend..." << endl;
     exit(-1);
  }
  cap.set(CV_CAP_PROP_FRAME_WIDTH, width);
  cap.set(CV_CAP_PROP_FRAME_HEIGHT, height);
  cap >> capImg;
  imwrite("/home/root/akshay/final/frame.jpg", capImg);
  cap.release();
  imshow("Color", capImg);
  switch(parameter)
  {
     // COLOR IMAGE
     case 'A' :
     imwrite("/home/root/akshay/final/color.jpg", capImg);
     imshow("Color Image", capImg);
     break;
     // GRAY IMAGE
     case 'B' :
     cvtColor(capImg, grayImg, CV_BGR2GRAY);
     imwrite("/home/root/akshay/final/gray.jpg", grayImg);
     imshow("Gray Image", grayImg);
     break;
     // SOBEL IMAGE
     case 'C' :
     GaussianBlur( capImg, capImg, Size(3,3), 0, 0, BORDER_DEFAULT );
     cvtColor( capImg, sobleGrayImg, CV_RGB2GRAY );
     // Gradient X
     Sobel( sobleGrayImg, grad_x, ddepth, 1, 0, 3, sscale, sobelDelta, BORDER_DEFAULT );
     // Gradient Y
     Sobel( sobleGrayImg, grad_y, ddepth, 0, 1, 3, sscale, sobelDelta, BORDER_DEFAULT );
     convertScaleAbs( grad_x, abs_grad_x );
     convertScaleAbs( grad_y, abs_grad_y );
     addWeighted( abs_grad_x, 0.5, abs_grad_y, 0.5, 0, sobelImg );
     imwrite("/home/root/akshay/final/sobel.jpg", sobelImg);
     imshow("Sobel Image",sobelImg);
     break;
     // SEPIA IMAGE
     case 'D' :
     sepia << 0.131, 0.534, 0.272,
            0.168, 0.686, 0.349,
            0.189, 0.769, 0.393;
     cv::transform(capImg, sepiaImg, sepia);
     imwrite("/home/root/akshay/final/sepia.jpg", sepiaImg);
     imshow("Sepia Image", sepiaImg);
     break;
     // CANNY IMAGE
     case 'E' :
     cvtColor(capImg, cannyImg, CV_BGR2GRAY);
     Canny(cannyImg, cannyImg, threshold1, threshold2);
     imwrite("/home/root/akshay/final/cannyImg.jpg", cannyImg);
     imshow("Canny Image",cannyImg);
     break;
     // LAPLACE IMAGE
     case 'F' :
     GaussianBlur( capImg, capImg, Size(3,3), 0, 0, BORDER_DEFAULT );
     Laplacian( capImg, dstImg, ddepth, kernel_size, lscale, laplaceDelta, BORDER_DEFAULT );
     convertScaleAbs( dstImg, laplaceImg );
     imwrite("/home/root/akshay/final/laplace.jpg", laplaceImg);
     imshow( "Laplace Image", laplaceImg );
     break;
     // CANNY BLUR IMAGE
     case 'G' :
     cvtColor(capImg, cb_grayImg, CV_BGR2GRAY);
     Canny(cb_grayImg, cb_grayImg, threshold1, threshold2);
     blur( cb_grayImg, cblurImg, Size(4,4) );
     imwrite("/home/root/akshay/final/cblur.jpg", cblurImg);
     imshow("Canny Blur Image",cblurImg);
     break;
     // Pattern Image
     case 'H' :
     dst = cv::Mat::zeros(capImg.size(), CV_8UC3);
     cir = cv::Mat::zeros(capImg.size(), CV_8UC1);
     for (int i = 0; i < capImg.rows; i += bsize)
     {
        for (int j = 0; j < capImg.cols; j += bsize)
        {
           Rect rect = cv::Rect(j, i, bsize, bsize) &
                           cv::Rect(0, 0, capImg.cols, capImg.rows);
           Mat sub_dst(dst, rect);
           sub_dst.setTo(cv::mean(capImg(rect)));
           circle(cir, cv::Point(j+bsize, i+bsize), bsize/2-1, CV_RGB(255,255,255), -1, CV_AA);
        }
     }
     cir.convertTo(cir_32f, CV_32F);
     normalize(cir_32f, cir_32f, 0, 1, cv::NORM_MINMAX);
     dst.convertTo(dst_32f, CV_32F);
     vector channels;
     split(dst_32f, channels);
     for (int i = 0; i < channels.size(); ++i)
          channels[i] = channels[i].mul(cir_32f);
       merge(channels, dst_32f);
       dst_32f.convertTo(dst, CV_8U);
       imwrite("/home/root/akshay/final/pattern.jpg", dst);
       imshow("Pattern Image", dst);
       break;
  }
  return 0;
}
11

软件前端

技术堆栈

1)Ionic:( http://ionicframework.com/)

ionicionic是一个用来开发混合手机应用的,开源的,免费的代码库,专注于用WEB开发技术,是基于HTML5创建类似于手机平台原生应用的一个开发框架。这个框架的目的是从web的角度开发手机应用,基于PhoneGap的编译平台,可以实现编译成各个平台的应用程序,可以优化html、css和js的性能,构建高效的应用程序,而且还可以用于构建Sass和AngularJS的优化。

2)AngularJS(https://angular.io/)

HTML是一门很好的为静态文本展示设计的声明式语言,但当我们试图用它来制作网络应用动态视图时,它是不能够实现的。AngularJS使用了不同的方法,它尝试去补足HTML本身在构建应用方面的缺陷。AngularJS通过使用我们称为标识符(directives)的结构,让浏览器能够识别新的语法。由此产生的环境是极富表现力的,可读性强,发展迅速。

3)Angular Material(https://material.angularjs.org/)

Angular Material项目是Angular.js中的材料设计,以实现相应功能。这个项目提供了一套基于材料设计系统的可重复使用的、经过严格测试可访问的UI组件。

12

软件后端


技术堆栈:

1)FireBase:(https://www.firebase.com/)

FireBase可以增强您的应用程序的后台,包括数据存储,用户认证,静态托管等。专注于创造非凡的用户体验。

2)Zapier(https://zapier.com/)

Zaps(快速切换)使用触发和行动来自动创建。你可以使用实现任何两个支持Zapier应用程序的连接。

3)数据库

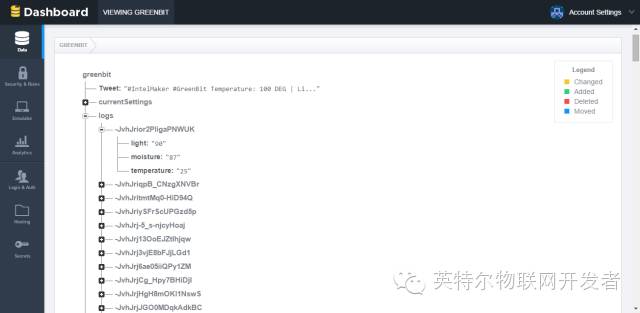
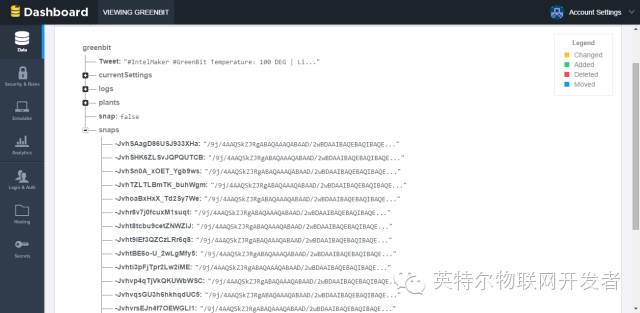
数据库模式在附件中以照片形式被分享。

13
连接

手机应用程序(https://github.com/shailesh17mar/GreenBit-IONIC)

网页(https://github.com/shailesh17mar/GreenBit)

手机端和网页端的资料和设置都在这两个网址中哦~~~